Setting up a non-working days calendar enables you to define the period of time between a transaction's booking date and its value date in Treasury. Depending on the country you chose when signing up (France, Italy or Spain), Iziago creates a default non-working days calendar (called "Default calendar"). When you create a forecast transaction, this calendar is used by default to calculate the value date of the transaction from its booking date or vice versa.
Depending on your bank's non-working days, you can edit this calendar, or create a new one.
Adding a non-working days calendar
- Select the Settings > General settings > Non-working days calendars menu and click on + Add new calendar.
- In the Name field, enter the name of the calendar.
- To complete the creation of your calendar, fill in the screen’s fields with the help of following information:
- Description: Enter the description of the calendar in order to identify it easily.
- Weekly non-working days: Check the recurring non-working days.
- Other non-working days: You can add specific non-working days (other than weekend days). To do so, proceed as follows:
- In the drop-down list, select the concerned year.
- In the Date column, enter or select a date.
- To make this days an annual non-working day, select the checkbox in the Repeat yearly column.
- If you wish to add more non-working days, click on Add new value.
- If you wish to delete one of the entries, click on
 .
.
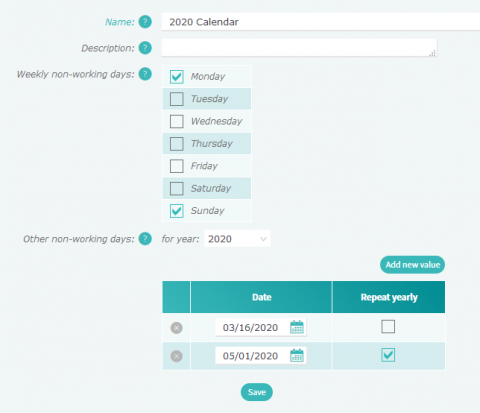
In the example below:
- Mondays and Sundays are recurrent non-working days.
- The 16th of March is a non-working day only in 2020.
- The 1st of May is a yearly non-working day.
Click to enlarge
- To save your calendar, click on Save.
- If you wish for this calendar to be taken into account when creating a forecast transaction, you must link this calendar to one or more transaction codes in a banking term profile. To do so, refer to Value date banking term profiles.
Displaying and editing a non-working days calendar
Prerequisites: You must have the Display right as well as the Create, modify and delete right on calendars in the Users and Rights > User Administration > Users menu.
- Select the Settings > General settings > Non-working days calendars menu.
- Select the desired calendar in the table. The calendar is displayed in the Edit screen.
Tip: To switch from one calendar to another, use the Calendar drop-down list at the top of the screen.
- Enter or modify the desired information.
- Click on Save.
Deleting a non-working days calendar
Prerequisites:
- You must have the Display right as well as the Create, modify and delete right on calendars in the Users and Rights > User Administration > Users menu.
- You can delete a calendar only if it is not linked to a transaction code in a banking term profile. To delete a calendar, you need to link another calendar to the transaction code in the value date banking term profile.
- Select the Settings > General settings > Non-working days calendars menu.
- In the table:
- Click on on the line of the calendar to be deleted and then confirm the deletion.
- Select the desired calendar. The calendar is displayed in the Edit screen. Click on Delete then confirm the deletion.